There have been a wealth of articles, many from reputable sources, offering advice on how to winterize your home. But too often the author ends up confusing facts with speculation and mythology, with the result that the suggestions offered are either the obvious, practical ones needing little explanation, or they are less-rational but still convincing—promoting practices where the cry of the sirens tempts us to do the wrong things for the “right” reason or, worse yet, attempt to get us to do the inappropriate thing for purely social or corporate fulfillment. In many instances, it is difficult to distinguish fact from myth.
Here follows my effort to boil down this jumble of information into a few provable, dare I say sustainable, facts. Starting in the cellar and working up to the roof, I have attempted to codify winterization techniques that are relatively easily achievable and/or economically viable.
There are some basic premises that will guide our actions:
1. Entropy is always at work. This law of science roughly states that everything in the universe is trying to reach an equal energy level. This not only applies to the stars and planets but to the hot and cold areas in and around your house. You can slow the process down but sooner or later you either have to add more heat (energy) on a cold day or watch your house even out its energy level with the surrounding environment. At this point it is of small comfort that you have contributed microscopically to the warming of the air mass around you.
2. Air infiltration is the enemy. (Unfortunately, for those of us in the preservation area, the possibility of achieving a too tight home offers such a pitiful return on investment as to be not worth considering.)
3. Always think through the hidden impact of each decision. This impact can be economic or environmental, and it can take place some place very far down the road. Thinking things through can lead you to an investigation of what I call the “Darker Side of Green” (about which I will explain later). It also involves a personal assessment of areas where you are willing—and unwilling—to compromise. It probably uses more energy for me to use hot water when I shave than to use an electric razor but I just can’t bring myself to make the change.
4. There is no such thing as an energy efficient large house. No matter how efficient a large house (particularly an old one) is it is more or less self evident that if it were half the size it’s Carbon Footprint (EAEC or Estimated Attendant Energy Cost) would be less.
5. Every time we transfer energy from one form to another we loose some. It only follows that, the fewer energy exchanges we support, the more efficient our heating or cooling system will be. This is not to be taken as an admonition to set your house on fire to get efficient heating. Some control is desirable.
With all this in mind we will set off to climb from the cellar to the attic in an attempt to save a bit of energy. The climb will be good for us all.
IN THE CELLAR
If your house has a stone foundation, on a good sunny day turn out all the lights and wander about looking for places where there are holes through to the outside. It’s probably wise to ask yourself why the void is there lest you overlook some more serious problem. But if the occlusion seems relatively benign, you can mortar up these holes or fill them with insulating foam. I use the latter if there is any doubt as to whether or not you may want to go back and fuss with things later. If you scrape the rhino hide off any foam that may ooze through to the outside it will soon take on the color and texture of the surrounding stone. It may not hold up quite as long but it will still stay in place for 8 or 10 years.
Consider some form of storm window for your cellar windows. They are notorious leakers and often go unattended to.
Insulate all heating pipes and ducts in the cellar area. If you have hot air heat, the chances are you have leaky ducts. Without specialized testing equipment, the best you can usually do is to make a visual check: hold a couple of pieces of thread near a suspected leak while the system is on. This makes an inexpensive and relatively effective leak tester. Surprisingly, conventional duct tape is not the best tape for sealing up ductwork. It’s worth tracking down professional aluminum tapes such as 3M’s 425 aluminum tape (available from U-Line and other suppliers). Some leaks are best sealed with silicone caulk. There is a website that covers a number of duct related issues. <http://ducts.lbl.gov/>. Duct wrapping is a somewhat thankless chore but can pay good dividends in allowing the heat to get where it’s going as opposed to warming a crawl space somewhere. The new 2009 International Energy Conservation Code (IECC) will contain requirements for duct wrapping and other some other more strenious leakage tests. So far existing structures and Antique Homes are exempt but they're gaining on us. Note: it may be wise to avoid Fiberglass insulation until we are sure it’s not going to be the next Asbestos. A good environmentally sound product is Quiet-Duct wrap
http://www.acousticalsurfaces.com/quiet_duct_wrap/quiet_duct_wrap.htm?d=26. Heating pipes are best wrapped with closed cell pipe insulation. The semi split “therma-cel” insulation sold by Graingers in various diameters and thicknesses does just fine. Since you are going to have to slit the insulation tube to get it on existing plumbing, you might want to arm yourself with some black vinyl tape such as mystic tape to seal up joints and corners. (This is one place where duct tape works reasonably well.) For the ultimate installation, the Brady Company http://www.bradyid.com offers pipe labeling tape and tape with flow arrows on it. Go wild.
If you have a furnace for hot air heat, check the service record to insure that the filters have been recently cleaned or replaced.
If you have one, take a look at the boiler. Make sure the boiler has been cleaned and serviced, and check to see if there are any voids in the jacket around places where the pipes and fittings are attached. These junctures may be the place for a bit of fiberglass insulation covered with aluminum flashing, held down with some appropriately placed but short sheet metal screws. (I suppose you could use a bit of the foil tape here altho’ I’ve never tried it.) If you add the metal piece, make sure it has a bit of clearance between it and any pipe or fitting so you don’t have rubbing wear. I'll discuss temperature settings and thermostats later but one point I might as well make here is that, as counterintuitive as it sounds, leave the boiler on year round. This obviously applys to those with internal coils for hot water but even the strictly heating boilers benefit from being kept warm. The fire box lining is a fibrous material and humidity is it's enemy. The replacement cost probably exceeds the cost of the oil you save by shutting the heating system down completely.
The underside of the floor above can also be sealed and insulated. A good number of older homes, particularly of the “farmhouse” variety up through say the 1860’s, tended to have plank floors laid directly on the floor joists with no subflooring. (It’s amazing to note the number of homeowners who found out that what they thought was subflooring was actually the old wide plank floor that had been overlaid with strip oak or some other more recent material.) Since you already are downstairs in the cellar, be sure to look up and see if this is the case in you house. In either case, it is a good idea to staple 15# felt (Roofing Felt) to the underside of the floor. This way, if you have or do go back to the old board floor with all of its cracks and gaps, the black tar-paper covering of the roofing felt will just appear to be darkness below. [Did a liner of tar paper get in here before the roofing felt???] This liner will have to be fit in between your joists and stapled in place with a staple gun. On top of this layer, (actually below it), you will need to fasten a layer or two of rigid insulation. There are a number of ways to fasten the insulation, but probably the easiest is with carefully selected drywall screws picked to the correct length and installed so as not to go through the original flooring. (You never know!). There is a somewhat more complex installation, which allows you to look up and still see a wood floor, but I will let you reflect on exactly how much time you spend in your cellar looking up and threaten to inflict this technique on you at a later date…
ON THE FIRST FLOOR
Even if you have gone to the trouble of insulating the floor from below remember that, above the planking, rugs with a layer of padding serve as great sonic and thermal insulators. If used in the historical fashion, you can avoid having to finish the center of the floors in a good number of rooms. My house has three of the downstairs rooms that have been devoid of finish in the carpet area since the house was built over 150 years ago.
Once again, go and check around the walls and seal up any cracks or voids that may have appeared over the years. It is not uncommon for the sills to have rolled a bit in an old house, for example, or for one or the other wall to have moved out a bit leaving a noticeable gap in the process. (Quite often these voids show up as you strip off old wall paper or remove those later flooring additions.) Examine all windows to find any signs of recent movement and, if so, assess whether you need to get into some stabilization or repair work (rather sooner than later).
Draft excluders around electrical receptacles and switches will help block air from flowing in surprising quantities across the interior wall membrane. In an old house, installation of these gaskets on the interior walls may also stop drafts that arise from the cellar and other areas.
Be very, very cautious about insulating the exterior walls on an un-insulated house. Moisture as well as heat moves back and forth through the walls and the wall as a system is a very delicately balanced membrane. In Northern climates, the vapor barrier needs to be on the inside of the assembly in order to work properly. Moisture bearing air moving toward the exterior of a wall drops in temperature the closer it gets to the exterior siding. As this happens it can drop below the dew point, at which point the moisture will condense on whatever is available: insulation, sheathing, wood lathe, or plaster. Moisture if persistent leads to mold. The thoughtless insertion of the wrong type of insulation can produce mold on interior walls, soggy and useless insulation, and paint failure. There is also the possibility that the wall structure has little or no space for insulation to be inserted. Sometimes it’s best to leave well enough alone and find some comfort in the fact that heat rises.
Next we come to windows, which are probably the source of more misinformation and mythology than any other aspect of the remodeling field, (with the possible exception vinyl or aluminum siding). If you are the fortunate owner of your house’s original windows do not fall pray to the “replace your windows and save big money on your heating bills” line. There are reasons to replace your windows, and these are listed below, but none of them should be motivated by the prospect of energy savings.
Reasons to replace your windows:
1. The original windows are long gone and the proposed ones are more appropriate.
2. The sash or frames are rotted beyond reclamation. Remember, however, that you can do a great deal of restoration work for the price of a new window.
3. You propose to make architectural changes involving an alteration to the window layout or size. In this event, do any future owners a favor and save the old sash and frames somewhere.
4. There is some overriding reason to have state of the art windows in your home—preventing solar damage to a valuable art or furniture piece comes to mind. You should, however, first consider a storm panel with low-E glass or a double glazed protective panel with the even more efficient soft coat low-E. Presumably, if the objects being protected are this valuable and sensitive, the window won’t be opened anyway.
The Old House fraternity has been on to the window scam, more or less from the start. Some years ago ‘This Old House (This old Façade???)” had an article about the fact that thermo-pane windows were not worth the investment. They seem to have changed their tune lately, probably at the advertisers’ behest.
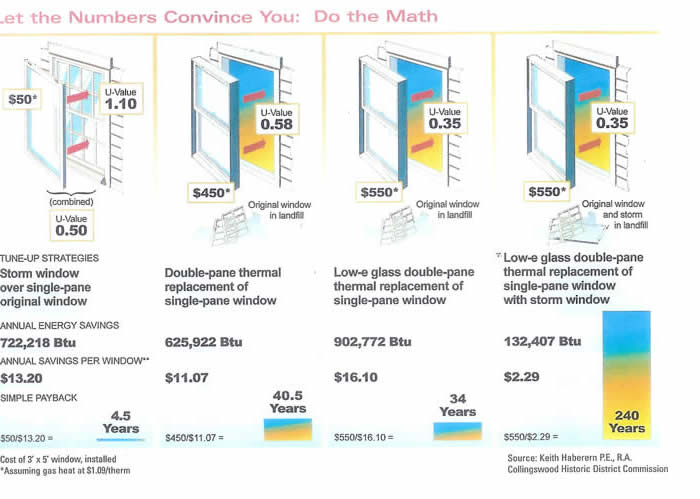
More recently, a study by Keith Haberern, P.E., R.A. ( Above) was published in Old House Journal magazine laying out the annual BTU savings and the simple payback period for window replacement. Adding a storm window over a single pane original window had a payback period of 4.5 years. Replacing an original window with a low-E double pane window had a payback time of 34 years Replacing a single pane window and storm with the same unit had an astounding payback period of 240 years! Additionally, both of the latter dumped additional material into our already choked landfills. This is nothing if not an ignominious end to windows that have probably lasted four or fie times longer than the longest warranty on the double glazed units.
As further evidence, it is noteworthy that the DOE allows the same insulating value for a single glazed window with a storm sash as it does for a double glazed unit when we do the ResCheck energy analysis.
So what to do? We recommend that if you have the windows that are original to your structure you do everything you can to preserve them. (We will be publishing a section on window conservation to go along with this piece.) Buy or make fitted storm sash and mount them with the proper hardware so you can open them up on those warm winter days. Some houses and house museums prefer to put the storm panels on the inside for aesthetic reasons. But after comparing the deterioration of a window whose upper sash had been protected with a storm panel with it’s lower sash which had not it became very evident that there is a huge advantage offered by letting the readily maintained storm panel take the abuse. If changing windows out and not having them custom made, use one of the few remaining single glazed units. Both Marvin and Brosco make authentic divided light units which accept an energy panel that moves with the sash and is removable for cleaning. These windows look right on an older house and can offer most of the advantages of the much more expensive but ultimately fragile high tech variety.
# # # |